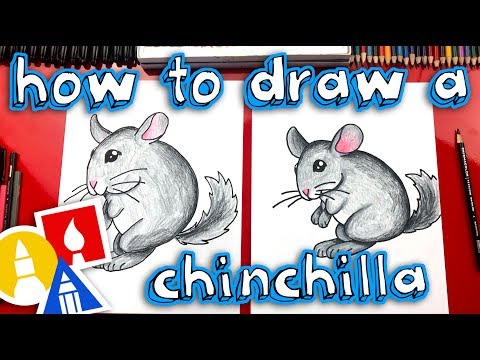
Drawing is a creative and expressive art form that allows us to capture the beauty of the world around us. Whether you are a beginner or an experienced artist, step-by-step guides can be incredibly helpful in learning to draw. In this blog post, we will be focusing on the fascinating subject of drawing a chinchilla. Chinchillas are small, adorable creatures with unique features and textures that make them an interesting subject for artists. By following the steps outlined in this guide, you will be able to master the art of drawing a chinchilla and create a stunning piece of artwork.
Briefly introduce the topic of drawing a chinchilla
Chinchillas are native to the Andes Mountains in South America and are known for their soft and dense fur. They have large, expressive eyes and cute little ears that make them a popular choice among animal lovers and artists. Drawing a chinchilla can be a fun and rewarding experience, allowing you to capture the essence of these adorable creatures on paper.
Explain the importance of step-by-step guides in learning to draw
Step-by-step guides are essential for beginners as they break down the drawing process into manageable steps. By following a structured approach, you can gradually build your skills and confidence in drawing. Step-by-step guides provide a clear roadmap, allowing you to understand the progression of the drawing and learn the techniques required to create a realistic representation of the subject.
State the purpose of the blog post: to help readers master the art of drawing a chinchilla
The purpose of this blog post is to provide you with a comprehensive guide that will help you master the art of drawing a chinchilla. We will cover everything from sketching the basic shapes to adding intricate details and textures to your drawing. By the end of this guide, you will have the knowledge and skills to create a stunning chinchilla drawing that you can be proud of.
Drawing a chinchilla is not only a great way to improve your artistic abilities but also a wonderful opportunity to appreciate the beauty of nature. So let’s gather our materials and dive into the step-by-step process of drawing a chinchilla.
Materials Needed
When it comes to drawing a chinchilla, having the right materials is essential to achieve the desired results. Here is a list of materials you will need to get started:
| Materials | Recommendations |
|---|---|
| Pencil | A good quality graphite pencil is recommended for sketching the initial shapes and details of the chinchilla. It allows for easy erasing and shading. A 2B or 4B pencil is ideal for this purpose. |
| Eraser | A soft eraser, such as a kneaded eraser or a vinyl eraser, is essential for correcting mistakes and refining the drawing. It should be able to erase pencil marks without smudging or damaging the paper. |
| Paper | Choose a smooth, heavyweight paper that can handle the pressure of the pencil and eraser. Drawing paper or bristol board are excellent options. Make sure the paper is acid-free to prevent yellowing over time. |
| Drawing Board | A drawing board or a sturdy surface to work on is necessary to provide stability and prevent the paper from wrinkling or shifting while drawing. It can be a dedicated drawing board or a firm clipboard. |
| Blending Stump | A blending stump or tortillon is useful for creating smooth transitions and blending shading in the chinchilla’s fur. It helps to achieve a realistic texture and depth in the drawing. |
| Reference Image | Find a clear and detailed reference image of a chinchilla to guide your drawing. It can be a photograph or a high-quality printout. Ensure that the image has good lighting and showcases the chinchilla’s features clearly. |
These materials are readily available at art supply stores or online platforms. While the recommendations provided are a good starting point, feel free to explore different brands and types of materials that suit your preferences and budget.
Remember, investing in high-quality materials can significantly enhance the outcome of your drawing. However, if you are a beginner or on a tight budget, don’t worry! You can still create beautiful chinchilla drawings with basic materials.
Before you begin, ensure that your workspace is well-lit and comfortable. Having a clean and organized workspace will help you focus on your drawing without any distractions.
Now that you have gathered all the necessary materials, it’s time to move on to the next step: sketching the basic shapes of the chinchilla.
Step 1: Sketching the Basic Shapes
When it comes to drawing a chinchilla, starting with the basic shapes is essential. This step lays the foundation for the entire drawing and helps ensure accurate proportions and positioning. Here’s a step-by-step guide to help you sketch the basic shapes of a chinchilla:
Begin with a Simple Outline
To start, use a light pencil to sketch a simple outline of the chinchilla’s body. Begin by drawing a large oval shape for the body and a smaller oval shape for the head. Connect these two shapes with a curved line to form the neck.
Add the Facial Features
Next, focus on adding the facial features. Draw two almond-shaped eyes on the head, making sure to leave enough space between them. Chinchillas have large eyes, so be sure to capture that characteristic in your drawing.
Below the eyes, sketch a small triangular shape for the nose. Chinchillas have a distinctive nose, so pay attention to its placement and size. Finally, add a small curved line for the mouth, slightly below the nose.
Refine the Proportions and Positioning
Once you have the basic shapes and facial features in place, it’s time to refine the proportions and positioning. Take a step back and assess your drawing. Make any necessary adjustments to ensure that the proportions are accurate and the positioning of the shapes and features is correct.
Pay attention to the size of the head in relation to the body, as well as the positioning of the eyes, nose, and mouth. Chinchillas have a compact body, so make sure the proportions reflect that.
Tips for Sketching the Basic Shapes
Here are a few tips to keep in mind as you sketch the basic shapes of a chinchilla:
Observe Reference Images: Look at reference images of chinchillas to get a better understanding of their anatomy and proportions. This will help you accurately depict their unique features.
Start Light: Use a light pencil or sketch lightly so that you can easily make adjustments as you go. This will allow you to refine the shapes and proportions without leaving heavy marks on the paper.
Take Your Time: Sketching the basic shapes is a crucial step, so take your time and be patient. Focus on capturing the overall form and proportions before moving on to adding details.
Practice Proportion: Pay attention to the relationship between different parts of the chinchilla’s body. For example, the size of the head in relation to the body, or the positioning of the facial features. Practice getting these proportions right to create a more realistic drawing.
By following these steps and tips, you’ll be well on your way to sketching the basic shapes of a chinchilla. Remember, practice makes perfect, so don’t be discouraged if your first attempts aren’t perfect. With time and dedication, you’ll master the art of drawing a chinchilla.
Step 2: Adding Details to the Face
When it comes to drawing a chinchilla, capturing the unique features of its face is crucial. In this step, we will guide you on how to draw the eyes, nose, and mouth of a chinchilla, and offer techniques to bring out its adorable characteristics.
Drawing the Chinchilla’s Eyes, Nose, and Mouth
Eyes: Start by sketching the chinchilla’s eyes. Chinchillas have large, round eyes that are full of expression. Begin with two oval shapes, slightly tilted towards each other. Add a smaller circle inside each oval to represent the iris. Leave a small white space to depict the reflection of light. To make the eyes more lifelike, add a hint of shading around the iris and eyelids.
Nose: Chinchillas have a distinctive nose shape that is similar to a small button. Draw a small, rounded triangle shape slightly above the center of the eyes. Connect the triangle to the eyes with curved lines to create the chinchilla’s snout. Add a tiny, curved line at the bottom of the triangle to represent the nostrils.
Mouth: Chinchillas have a cute, tiny mouth. Draw a small, curved line below the nose to represent the upper lip. Then, draw a slightly longer curved line below the upper lip to depict the lower lip. Keep the mouth simple and minimalistic, as chinchillas have small mouths compared to their face size.
Techniques for Capturing the Chinchilla’s Unique Features
Fur Texture: Chinchillas have soft and dense fur. To capture the texture, use short, light strokes with your pencil or pen. Start from the base of the fur and gradually build up the layers. Pay attention to the direction of the fur growth and try to mimic it in your drawing. Use lighter strokes for the areas where the fur appears lighter and darker strokes for the areas with deeper shadows.
Shading and Depth: To add depth to your chinchilla drawing, focus on shading. Identify the areas where the light hits the chinchilla’s face and leave those areas lighter. Gradually darken the areas that are in shadow. Use a blending tool or your finger to blend the shades smoothly. This will create a three-dimensional effect and make your drawing more realistic.
Remember, practice makes perfect. Don’t be discouraged if your first attempt doesn’t turn out exactly as you imagined. Keep refining your skills and experimenting with different techniques.
In this step, we explored how to add details to the face of a chinchilla. By following the techniques mentioned above, you can bring out the adorable features of this furry creature. Remember to pay attention to the eyes, nose, and mouth, as they play a significant role in capturing the chinchilla’s unique characteristics.
Continue to the next step, “V. Step 3: Drawing the Fur,” where we will delve into different methods for rendering the chinchilla’s fur texture and provide tips on shading and adding depth to your drawing.
Step 3: Drawing the Fur
Drawing the fur of a chinchilla is an essential step in bringing your artwork to life. The soft and fluffy texture of their fur is one of the defining features of these adorable creatures. In this step-by-step guide, I will explain different methods for rendering the chinchilla’s fur texture and provide tips on shading and adding depth to your drawing.
Understanding Fur Texture
Before diving into the techniques, it’s important to understand the unique characteristics of chinchilla fur. Chinchillas have dense fur that consists of multiple layers, giving them a plush appearance. The fur is made up of fine guard hairs and soft underfur, which creates a velvety texture.
To capture this texture in your drawing, you need to pay attention to the direction and flow of the fur. Chinchilla fur tends to grow in a specific pattern, so observe reference images or real chinchillas to understand how the fur lies on their bodies.
Method 1: Hatching and Cross-Hatching
One of the simplest and most effective techniques for drawing fur is hatching and cross-hatching. Start by lightly sketching the basic shape of the chinchilla’s body and then use short, parallel lines to create the illusion of fur. Vary the length and direction of the lines to mimic the natural flow of the fur.
For areas with darker shading or shadow, you can increase the density of the lines to add depth. Cross-hatching, which involves layering intersecting lines, can be used to create darker areas or emphasize the texture in specific regions.
Method 2: Stippling
Stippling is another technique that can be used to achieve a realistic fur texture. This method involves creating small dots or stipple marks to simulate the appearance of fur. Start by lightly sketching the shape of the chinchilla and then use a fine-tipped pen or pencil to apply the dots.
Vary the spacing and density of the dots to create different shades and textures. In areas where the fur is darker or denser, you can increase the concentration of dots. Stippling requires patience and precision, but it can produce stunning results when done correctly.
Adding Depth and Shading
To make your fur drawing more realistic, it’s important to add depth and shading. Pay attention to the light source in your composition and use shading techniques such as cross-hatching or stippling to create areas of shadow.
Start by identifying the areas of the chinchilla’s body that would naturally be darker or receive less light. Use a slightly darker shade or apply more pressure when hatching or stippling these areas. Gradually build up the layers of shading to create a three-dimensional effect.
Additionally, consider using an eraser to create highlights and add dimension to the fur. Lightly erase small sections of the fur to create the illusion of light reflecting off the strands.
Mastering the art of drawing chinchilla fur requires practice and attention to detail. By understanding the unique texture of chinchilla fur and employing techniques such as hatching, cross-hatching, and stippling, you can bring your artwork to life. Remember to pay attention to the direction and flow of the fur, add depth and shading, and experiment with different tools and techniques to achieve the desired effect. With patience and perseverance, you’ll be able to create stunning drawings of these adorable creatures.
Step 4: Adding the Body and Limbs
Drawing the body and limbs of a chinchilla is an important step in bringing your artwork to life. This is where you can add volume and proportion to your drawing, making it look more realistic. Here are some tips and techniques to help you master this step:
Guide readers on drawing the chinchilla’s body and limbs
Start by sketching the basic shapes: Begin by drawing an oval shape for the chinchilla’s body. This will serve as a foundation for adding the details later on. Next, draw a smaller oval shape for the head, connecting it to the body with a curved line.
Add the limbs: Draw four small ovals for the chinchilla’s limbs. Two should be placed at the bottom of the body for the hind legs, and the other two should be slightly higher for the front legs. Connect these ovals to the body using curved lines.
Define the shape: Refine the shape of the body and limbs by adding more curves and adjusting the proportions. Chinchillas have a round body and short limbs, so make sure to capture these characteristics in your drawing.
Provide tips on achieving a sense of volume and proportion
Add depth with shading: To create a sense of volume, use shading techniques to add shadows and highlights to the body and limbs. Chinchillas have dense fur, so pay attention to the direction of the fur when shading.
Use cross-hatching: Cross-hatching is a technique where you create a series of intersecting lines to add texture and depth to your drawing. Apply this technique to the body and limbs of the chinchilla to make it appear more realistic.
Pay attention to proportions: Chinchillas have a compact body with short limbs. Make sure the proportions of your drawing reflect this. Use reference images or observe real chinchillas to get a better understanding of their body structure.
Add details: Once you have established the basic shape and proportions, add details such as the paws and tail. Chinchillas have small, delicate paws, so be sure to capture their size and shape accurately.
Remember, practice makes perfect. Don’t be discouraged if your first attempts don’t turn out exactly as you envisioned. Drawing takes time and patience to master, so keep practicing and experimenting with different techniques.
Adding the body and limbs to your chinchilla drawing is a crucial step in creating a realistic and visually appealing artwork. By following the tips and techniques outlined above, you can bring your chinchilla to life on paper. Remember to pay attention to proportions, use shading to add depth, and practice regularly to improve your skills. With time and dedication, you’ll be able to create stunning chinchilla drawings that showcase your artistic talent.
Step 5: Final Touches and Details
After following the previous steps, you are now ready for the final touches and details that will bring your chinchilla drawing to life. This step is crucial as it adds depth and realism to your artwork. Here are some tips to help you enhance your drawing:
Offer guidance on adding final touches to complete the drawing
Refine the outlines: Go over the main outlines of your chinchilla drawing, making sure they are clean and well-defined. Use a fine-tip pen or a sharp pencil to achieve this.
Erase unnecessary lines: Carefully erase any unnecessary guidelines or construction lines that you no longer need. This will give your drawing a cleaner and more polished appearance.
Add texture: Chinchillas have soft and fluffy fur, so it’s important to depict this texture in your drawing. Use short, light strokes to create the illusion of fur. Pay attention to the direction of the fur and vary your strokes accordingly.
Highlight the eyes: The eyes are often the focal point of any drawing. Add highlights to the eyes to make them appear shiny and lifelike. Use a white gel pen or a light-colored pencil to achieve this effect.
Add shadows: Shadows add depth and dimension to your drawing. Identify the light source in your artwork and add shadows accordingly. Pay attention to the areas where the fur overlaps or casts shadows on the chinchilla’s body.
Provide suggestions for enhancing the overall composition
Background: Consider adding a simple background to your chinchilla drawing to enhance the overall composition. It could be a grassy field, a tree branch, or any other element that complements the subject. Keep the background subtle, so it doesn’t distract from the main focus.
Contrast: Create contrast by using darker values in the shadows and lighter values in the highlights. This will make your drawing more visually appealing and help the chinchilla stand out.
Details: Pay attention to the smaller details of the chinchilla’s features, such as the whiskers, ears, and paws. Adding these details will make your drawing more realistic and captivating.
Composition: Consider the placement of your chinchilla on the paper. Experiment with different compositions to find the most visually pleasing arrangement. You can position the chinchilla in the center, off to the side, or even in a diagonal orientation for a more dynamic composition.
Remember, practice makes perfect. Don’t be discouraged if your first attempt doesn’t turn out exactly as you envisioned. Drawing takes time and patience, so keep practicing and refining your skills.
In conclusion, drawing a chinchilla requires attention to detail and a step-by-step approach. By following this guide, you have learned how to sketch the basic shapes, add details to the face, draw the fur, and add the body and limbs. Finally, you have discovered the importance of final touches and details in completing your chinchilla drawing.
Keep in mind that every artist has their own style and interpretation, so feel free to experiment and add your personal touch to your artwork. With practice and perseverance, you will continue to improve your drawing skills and create stunning chinchilla illustrations.
Now, grab your sketchbook, gather your materials, and embark on your artistic journey to master the art of drawing a chinchilla. Happy drawing!
Additional Resources (optional)
When it comes to mastering the art of drawing a chinchilla, practice and perseverance are key. However, there are also additional resources that can aid in your learning journey. Here are some suggestions for further learning and reference materials:
Online Drawing Tutorials
The internet is a treasure trove of drawing tutorials, and there are numerous websites and platforms that offer step-by-step guides on drawing animals, including chinchillas. Websites like ArtTutor and Drawspace provide a wide range of tutorials for artists of all skill levels. These tutorials often include detailed instructions, images, and videos to help you understand the process better.
Drawing Books
If you prefer learning from physical resources, investing in drawing books can be a great option. Look for books that specifically focus on animal drawing or general drawing techniques. Some popular titles include “Drawing Animals” by Jack Hamm and “Drawing on the Right Side of the Brain” by Betty Edwards. These books often provide valuable insights, tips, and techniques that can enhance your drawing skills.
Online Art Communities
Joining online art communities can be a fantastic way to connect with fellow artists, share your work, and gain inspiration. Platforms like DeviantArt and Behance allow you to showcase your drawings, receive feedback from other artists, and participate in challenges and contests. Engaging with a community of artists can provide valuable insights, encouragement, and opportunities for growth.
YouTube Channels
YouTube has become a popular platform for artists to share their drawing techniques and tutorials. There are numerous channels dedicated to teaching drawing, and some even specialize in animal drawing. Channels like Proko and TheVirtualInstructor offer in-depth tutorials, tips, and demonstrations that can help you improve your chinchilla drawing skills. Watching these videos can provide visual guidance and inspiration as you learn.
Local Art Classes or Workshops
If you prefer a more hands-on approach to learning, consider enrolling in local art classes or workshops. Many art studios and community centers offer drawing classes that cover a variety of subjects, including animals. These classes provide an opportunity to learn from experienced instructors, receive personalized feedback, and interact with other aspiring artists. Check your local listings or community bulletin boards for information on available classes in your area.
Remember, the key to improving your drawing skills is consistent practice and a willingness to learn. Experiment with different techniques, seek feedback, and don’t be afraid to make mistakes. With time and dedication, you can master the art of drawing a chinchilla and create beautiful and realistic illustrations.
So, take advantage of the additional resources mentioned above and embark on your artistic journey. Happy drawing!
