Briefly introduce the topic of hock lock in turkeys
Hock lock is a common issue that can occur in turkeys, causing discomfort and hindering their mobility. It refers to a condition where the hock joint, located in the lower part of the leg, becomes locked or stuck, making it difficult for the turkey to move freely. This can be a painful experience for the bird and can lead to further health problems if not addressed promptly.
Explain the importance of knowing how to remove hock lock
As a responsible turkey owner or farmer, it is crucial to have the knowledge and skills to remove hock lock in turkeys. By being able to identify and address this condition, you can alleviate the bird’s pain and prevent potential complications. Removing hock lock will restore the turkey’s mobility, allowing it to walk, run, and engage in normal activities without discomfort.
Provide a preview of the steps to be discussed in the blog post
In this blog post, we will guide you through the process of removing hock lock in turkeys. We will begin by explaining what hock lock is and why it occurs. Then, we will discuss the tools and preparation needed for the procedure. Next, we will provide a step-by-step guide to removing hock lock, including proper restraint techniques, identifying the hock lock, loosening it, and finally, removing it. We will also cover aftercare for the turkey and offer tips on preventing hock lock in the future. By the end of this blog post, you will have a comprehensive understanding of how to address hock lock in turkeys and ensure their well-being.
Understanding Hock Lock
Define what hock lock is and its significance in turkeys
Hock lock is a condition that occurs in turkeys where the hock joint, located in the lower leg, becomes locked or stuck in a flexed position. This condition can be quite painful for the turkey and can limit its mobility. The hock joint is responsible for supporting the weight of the turkey and allowing it to move around freely. When hock lock occurs, the turkey is unable to extend its leg fully, resulting in a flexed position that restricts its movement.
Understanding hock lock is crucial for turkey owners and farmers as it can have significant implications on the overall health and well-being of the birds. If left untreated, hock lock can lead to further complications such as joint inflammation, muscle atrophy, and even infection. It can also affect the turkey’s ability to forage, walk, and engage in normal activities, which can impact its overall quality of life.
Discuss the reasons why hock lock occurs in turkeys
There are several factors that can contribute to the development of hock lock in turkeys. One of the primary causes is improper nutrition. Turkeys that are fed an unbalanced diet or lack essential nutrients such as calcium, vitamin D, and manganese are more prone to developing hock lock. These nutrients play a crucial role in maintaining the health and strength of the bones and joints, and their deficiency can lead to weakened joints and increased susceptibility to hock lock.
Another common cause of hock lock is overcrowding and lack of space. Turkeys that are kept in cramped conditions or confined to small enclosures are more likely to develop hock lock due to the limited space for movement. The constant pressure on the hock joint can cause it to become locked in a flexed position over time.
Injury or trauma to the hock joint can also result in hock lock. Turkeys that have experienced a fall, collision, or any other form of physical injury may develop hock lock as a result of the damage caused to the joint. In some cases, hock lock can also be a genetic condition, where certain turkeys are predisposed to developing this issue due to their genetic makeup.
Understanding the reasons behind hock lock in turkeys is essential for implementing preventive measures and ensuring the overall well-being of the birds. By addressing these underlying causes, turkey owners and farmers can reduce the risk of hock lock and provide their birds with a healthier and more comfortable living environment.
In the next section, we will discuss the necessary tools and preparation required for removing hock lock in turkeys. Stay tuned for valuable insights and practical tips!
Tools and Preparation
When it comes to removing hock lock in turkeys, having the right tools and being properly prepared is essential. This section will provide a list of necessary tools and equipment, as well as tips on how to prepare the workspace and ensure safety.
Necessary Tools and Equipment
Before attempting to remove hock lock in turkeys, gather the following tools and equipment:
Pliers: Pliers are essential for loosening and removing the hock lock. Choose a sturdy pair with a good grip to ensure effective handling.
Towels or Gloves: It is important to protect your hands while working with turkeys. Use either towels or gloves to provide a barrier between your skin and the turkey’s legs.
Scissors: Scissors may be needed to cut any excess material or tangled feathers around the hock lock area.
Disinfectant: Keeping your tools clean and sanitized is crucial to prevent the spread of bacteria or infections. Have a disinfectant solution on hand to clean your tools before and after use.
First Aid Kit: Accidents can happen, so it’s always wise to have a first aid kit nearby. Include items such as bandages, antiseptic ointment, and tweezers for removing splinters.
Workspace Preparation and Safety
Before you begin removing hock lock in turkeys, take the following steps to prepare your workspace and ensure safety:
Clean and Sterilize: Start by thoroughly cleaning and sterilizing the area where you will be working. This includes your tools, work surface, and any other equipment you will be using.
Secure the Turkey: It is crucial to properly restrain the turkey to prevent any sudden movements or escape attempts. Use a secure method such as a turkey holder or have someone assist you in holding the turkey firmly.
Wear Protective Clothing: Protect yourself by wearing appropriate clothing, including long sleeves, gloves, and closed-toe shoes. This will minimize the risk of scratches or injuries from the turkey’s sharp claws.
Work in a Well-Lit Area: Ensure that your workspace is well-lit to avoid any accidents or mistakes during the process. Good lighting will help you see the hock lock clearly and perform the necessary steps accurately.
Maintain a Calm Environment: Turkeys can sense fear or anxiety, which may cause them to become more agitated. Create a calm and quiet environment to keep the turkey as relaxed as possible during the procedure.
Have Assistance: Removing hock lock in turkeys can be a challenging task, especially if you are doing it for the first time. It is advisable to have someone assist you, especially in restraining the turkey or providing additional support.
By having the right tools and preparing your workspace properly, you will be well-equipped to remove hock lock in turkeys safely and effectively. Remember to prioritize safety and take the necessary precautions throughout the process.
Step-by-Step Guide to Removing Hock Lock
Hock lock is a condition that can occur in turkeys, causing their legs to become locked in a bent position. This can be painful and restrict the turkey’s movement, making it difficult for them to walk or stand properly. If you encounter a turkey with hock lock, it is important to know how to remove it safely and effectively. In this step-by-step guide, we will walk you through the process of removing hock lock from a turkey.
Step 1: Properly restraining the turkey
Importance of restraining the turkey securely: Before attempting to remove the hock lock, it is crucial to restrain the turkey securely. This will prevent any unnecessary movement or injury during the process.
Different methods for restraining the turkey: There are several methods you can use to restrain a turkey. One common method is to gently wrap the turkey’s wings with a towel or cloth to prevent flapping. You can also ask for assistance from another person to hold the turkey’s body while you work on removing the hock lock.
Step 2: Identifying the hock lock
How to identify the hock lock on a turkey: The hock lock is located in the joint of the turkey’s leg, just above the hock. It is a tight and rigid position that prevents the leg from straightening.
Signs and symptoms of hock lock: Look for signs such as the turkey struggling to walk or stand, the leg appearing bent at an unnatural angle, or the turkey showing signs of discomfort or pain when trying to move.
Step 3: Loosening the hock lock
Different techniques for loosening the hock lock: There are a few techniques you can use to loosen the hock lock. One method is to gently massage the joint, applying light pressure to help relax the muscles and tendons. Another technique is to apply a warm compress to the area, which can help to reduce inflammation and increase flexibility.
Detailed instructions on how to perform each technique: When massaging the joint, use circular motions and gradually increase the pressure. Be gentle and patient, as it may take some time for the hock lock to loosen. When applying a warm compress, ensure it is not too hot and hold it against the joint for around 10-15 minutes, repeating as necessary.
Step 4: Removing the hock lock
Process of removing the hock lock from the turkey: Once the hock lock has been loosened, it is time to carefully straighten the turkey’s leg. Hold the turkey’s leg above the hock joint and gently apply pressure to straighten the leg. Be cautious and avoid using excessive force to prevent any injury to the turkey.
Tips and precautions for a successful removal: It is important to be patient and gentle when removing the hock lock. Take breaks if needed, and if you encounter any resistance, stop and try again later. If you are unsure or uncomfortable with the process, it is recommended to seek assistance from a veterinarian or an experienced poultry handler.
By following these step-by-step instructions, you can safely and effectively remove hock lock from a turkey. Remember to prioritize the turkey’s well-being and handle them with care throughout the process.
Aftercare and Prevention
After successfully removing the hock lock, it is crucial to provide proper aftercare for the turkey. Ensure they have a comfortable and clean environment to rest and recover in. Monitor their leg for any signs of discomfort or swelling and consult a veterinarian if necessary.
To prevent hock lock in turkeys in the future, it is essential to provide them with a spacious and well-maintained living area. Regular exercise and a balanced diet can also contribute to their overall leg health. Additionally, avoid overcrowding the turkeys, as this can increase the risk of hock lock.
In conclusion, knowing how to remove hock lock from turkeys is important for their well-being and mobility. By following the step-by-step guide provided in this article, you can effectively address this condition and ensure the turkey’s comfort. Don’t hesitate to try these techniques and share your experiences. If you have any questions or comments, feel free to leave them below.
Step 2: Identifying the Hock Lock
Identifying the hock lock in turkeys is crucial in order to effectively remove it and alleviate any discomfort or pain the bird may be experiencing. Here, we will discuss how to identify the hock lock on a turkey and highlight the signs and symptoms to look out for.
What is Hock Lock?
Hock lock, also known as “stuck hock,” is a condition that occurs when the tendon in a turkey’s leg becomes trapped or entangled, causing the leg to become immobile. This can be a painful and distressing condition for the bird, as it restricts their movement and ability to walk or stand properly.
Signs and Symptoms of Hock Lock
Identifying hock lock in turkeys can be done by observing certain signs and symptoms. Here are some indicators to look out for:
Limping or Lameness: A turkey with hock lock will exhibit difficulty in walking or standing. They may limp or favor one leg over the other.
Inability to Extend the Leg: The affected leg will be unable to fully extend or straighten, remaining in a bent position.
Swelling or Inflammation: The hock joint may appear swollen, red, or inflamed due to the trapped tendon.
Pain or Discomfort: The turkey may exhibit signs of pain or discomfort when pressure is applied to the affected leg.
Inspecting the Hock Joint
To identify the hock lock, it is necessary to inspect the hock joint of the turkey. The hock joint is located at the bend of the leg, just above the foot. Here’s how you can inspect the hock joint:
Gently Hold the Leg: Securely hold the turkey’s leg, ensuring that you have a firm grip without causing any harm or discomfort to the bird.
Feel for Abnormalities: Using your fingers, gently feel the hock joint for any abnormalities. You may notice a tight or tense feeling, indicating the presence of a hock lock.
Observe the Leg Position: Pay attention to the leg’s position. If it remains bent or unable to straighten, it is likely that a hock lock is present.
Check for Swelling or Inflammation: Look for any signs of swelling, redness, or inflammation around the hock joint. These are common indications of hock lock.
Seeking Professional Help
If you are unsure about identifying the hock lock or if the turkey’s condition worsens, it is always recommended to seek professional veterinary assistance. A veterinarian will be able to provide a proper diagnosis and guide you through the necessary steps to alleviate the hock lock.
Identifying the hock lock in turkeys is an essential step in the process of removing it. By recognizing the signs and symptoms, inspecting the hock joint, and seeking professional help when needed, you can ensure the well-being of the bird and effectively address the hock lock issue. In the next section, we will discuss the techniques and steps to loosen and remove the hock lock from the turkey, providing detailed instructions for a successful procedure.
Step 3: Loosening the Hock Lock
Loosening the hock lock is a crucial step in removing hock lock from turkeys. This step requires careful technique and precision to ensure the safety and well-being of the bird. Here, we will discuss different techniques and provide detailed instructions on how to perform each technique effectively.
Technique 1: Warm Water Soak
One effective technique for loosening the hock lock is to give the turkey a warm water soak. This helps to relax the muscles and soften the hock lock, making it easier to remove. Here’s how to perform this technique:
- Fill a basin or sink with warm water. Make sure the water is not too hot to avoid scalding the turkey.
- Gently place the turkey’s legs in the warm water, ensuring that the hock lock is fully submerged.
- Allow the turkey to soak for about 10-15 minutes. During this time, you can gently massage the hock lock to help loosen it.
- After the soak, carefully remove the turkey from the water and proceed to the next step of removing the hock lock.
Technique 2: Olive Oil Massage
Another effective technique for loosening the hock lock is to massage the affected area with olive oil. Olive oil helps to lubricate the joint, making it easier to manipulate and remove the hock lock. Follow these steps to perform this technique:
- Pour a small amount of olive oil into your hands and rub them together to warm the oil.
- Gently massage the olive oil onto the hock lock, focusing on the joint area.
- Use circular motions and light pressure to work the oil into the hock lock.
- Continue massaging for a few minutes, ensuring that the oil penetrates the joint.
- Once the hock lock feels more flexible, proceed to the next step of removing the hock lock.
Technique 3: Gentle Manipulation
In some cases, gentle manipulation of the hock lock can help loosen it. This technique requires caution and a gentle touch to avoid causing any harm to the turkey. Here’s how to perform this technique:
- Carefully hold the turkey’s leg above the hock lock with one hand, providing support and stability.
- With your other hand, gently apply pressure to the hock lock in a downward motion.
- Slowly and gently move the joint back and forth, applying slight pressure to encourage movement.
- Be patient and take your time, allowing the hock lock to gradually loosen.
- If necessary, you can also try rotating the joint gently to further loosen the hock lock.
- Once the hock lock feels more flexible, proceed to the next step of removing the hock lock.
Remember, patience and gentle handling are key when loosening the hock lock. Rushing or using excessive force can cause injury to the turkey. If you encounter any difficulties or if the hock lock does not loosen, it is best to consult a professional or a veterinarian for assistance.
By following these techniques and instructions, you can effectively loosen the hock lock in turkeys, making it easier to proceed with the removal process. The next step, “Step 4: Removing the Hock Lock,” will guide you through the final stage of successfully removing the hock lock from the turkey.
Continue reading the blog post to learn the importance of proper aftercare for the turkey and valuable tips on preventing hock lock in turkeys in the future.
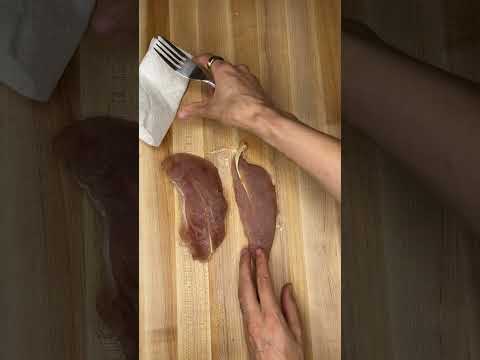
Step 4: Removing the Hock Lock
Removing the hock lock from a turkey is a delicate process that requires precision and care. By following the correct steps, you can ensure a successful removal without causing any harm to the bird. Here, we will discuss the process of removing the hock lock and provide some tips and precautions to help you along the way.
Explain the Process of Removing the Hock Lock
To begin with, it is important to understand the process of removing the hock lock from a turkey. The hock lock is a condition where the tendon in the turkey’s leg becomes locked, making it difficult for the bird to move or walk properly. Removing the hock lock involves gently manipulating the tendon to release the lock and restore normal movement.
Offer Tips and Precautions
When removing the hock lock, it is crucial to handle the turkey with care to avoid causing any additional stress or injury. Here are some tips and precautions to keep in mind:
Be gentle: The tendon in the turkey’s leg is delicate, so it is essential to handle it with utmost care. Apply gentle pressure and avoid using excessive force to prevent any harm to the bird.
Use lubrication: Applying a small amount of lubrication, such as vegetable oil, to the tendon can make it easier to manipulate and loosen the hock lock. This will reduce the risk of causing any discomfort or pain to the turkey.
Work slowly and patiently: Removing the hock lock requires patience and precision. Take your time and work slowly, making small adjustments to the tendon until you feel it releasing. Rushing through the process can lead to mistakes or injuries.
Have a second person assist: Having an extra pair of hands can be beneficial when removing the hock lock. While one person holds the turkey securely, the other can focus on manipulating the tendon. This teamwork ensures a safer and more efficient process.
Monitor the turkey’s reaction: Pay close attention to the turkey’s reaction throughout the process. If the bird shows signs of distress or pain, stop immediately and consult a veterinarian for further guidance.
Removing the hock lock from a turkey is a crucial step in ensuring the bird’s well-being and mobility. By following the correct techniques and taking necessary precautions, you can successfully release the lock and restore normal movement for the turkey. Remember to be gentle, patient, and observant throughout the process to avoid causing any harm to the bird.
Aftercare and Prevention
After successfully removing the hock lock from a turkey, it is crucial to provide proper aftercare to ensure the bird’s well-being. Additionally, taking preventive measures can help reduce the chances of hock lock occurring in the future. In this section, we will discuss the importance of aftercare and provide tips for preventing hock lock in turkeys.
Proper Aftercare for the Turkey
Resting and Isolation: After the hock lock removal procedure, it is essential to allow the turkey to rest in a quiet and isolated area. This will minimize stress and give the bird time to recover.
Observation: Keep a close eye on the turkey for the next few hours to ensure there are no complications or signs of distress. Look for any bleeding, swelling, or difficulty in movement.
Cleanliness: Maintain a clean environment for the turkey to prevent infections. Regularly clean the area where the bird is resting and provide fresh bedding.
Hydration and Nutrition: Offer the turkey plenty of fresh water to keep it hydrated. Additionally, provide a balanced diet to support its recovery. Consult a veterinarian or poultry expert for specific dietary recommendations.
Limited Activity: Restrict the turkey’s movement for a few days to prevent any strain on the hock joint. Avoid activities that may cause stress or put pressure on the legs.
Medication: If recommended by a veterinarian, administer any prescribed medication to aid in the turkey’s recovery. Follow the dosage instructions carefully.
Prevention of Hock Lock in Turkeys
Proper Nutrition: Ensure that turkeys receive a well-balanced diet that meets their nutritional requirements. A diet lacking in essential nutrients can contribute to weak leg joints and increase the risk of hock lock.
Exercise and Space: Provide ample space for turkeys to move around and exercise. Regular physical activity helps strengthen their leg muscles and joints, reducing the likelihood of hock lock.
Avoid Overcrowding: Overcrowding can lead to stress and increased aggression among turkeys. This can result in injuries and hock lock. Provide enough space for each bird to minimize the risk.
Flooring and Bedding: Use appropriate flooring and bedding materials that provide good traction and cushioning. This helps prevent slips, falls, and injuries that may lead to hock lock.
Regular Inspections: Conduct regular inspections of the turkeys’ legs and joints to identify any signs of hock lock early on. Prompt intervention can prevent the condition from worsening.
Proper Handling: Handle turkeys with care, especially when restraining them. Rough handling can cause stress and injuries, increasing the chances of hock lock.
Environmental Conditions: Maintain optimal environmental conditions, including temperature and humidity, to promote healthy growth and reduce stress on the turkeys’ joints.
By following these aftercare practices and preventive measures, you can ensure the well-being of your turkeys and minimize the occurrence of hock lock. Remember, early detection and prompt action are crucial in treating and preventing this condition.
In conclusion, knowing how to remove hock lock from turkeys is essential for their health and well-being. By following the step-by-step guide provided in this blog post and implementing proper aftercare and preventive measures, you can effectively address hock lock issues in your turkeys. Remember to consult a veterinarian or poultry expert for any specific concerns or questions. We encourage you to try these techniques and share your experiences in the comments below. Together, let’s ensure the optimal health of our turkeys.
